Request Timescale
Use this function to configure a resolution according to a priority basis.
The following applies to this function:
A Request must be either in Assigned or Work In Progress state before the Response Time ends.
Auto Escalation process is triggered if assignee doesn’t resolve a Request from Assigned/Work-In-Progress to Fulfilled/Closed state before the Resolution Time ends.
Notification email will be delivered to the configured user in case of Before/After the Response/Resolution Time violation.
Response time and the Resolution Time are defined as per the Service Level Agreements between the Client and the Service Provider.
If the support level teams do not resolve a Request within the specified time frame, then it is declared as SLA breach
SLA time will not be recalculated on the following case: Root cause CI/ Assignee is changed.
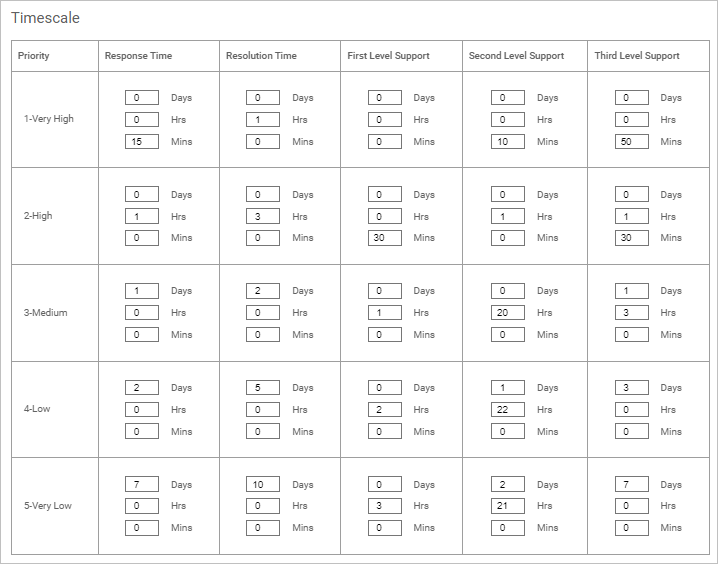
In the main window, click Admin > Request Management > Request Timescale. The Request Timescale window displays.
1 day is equal to 24 working hours. (For more info, see Operational Hours.)
The numbers must be entered manually.
The timescale definitions for the various types of priorities are shown below.
Click in the field, and scroll the up or down arrows until the desired time interval is displayed.
Timescale Definitions
| Parameter | Hours of Support | Response Target | Resolution Target |
|---|---|---|---|
| Priority 1 – Major Incident | 24×7 |
15 minutes |
2 hours |
| Priority 2 - Critical | Business Hours |
30 minutes |
4 business hours |
|
Priority 3 - High |
Business Hours |
2 hours |
1 business day |
|
Priority 4 - Normal |
Business Hours |
1 business day |
5 business days |
Escalate
If the incident is breached during the defined time, the escalation matrix goes into effect.

| 1. | Click the drop-down list and select if the time is Before or After the defined interval. |
| 2. | Click in the field and scroll the up or down arrow until the desired time interval is displayed. |
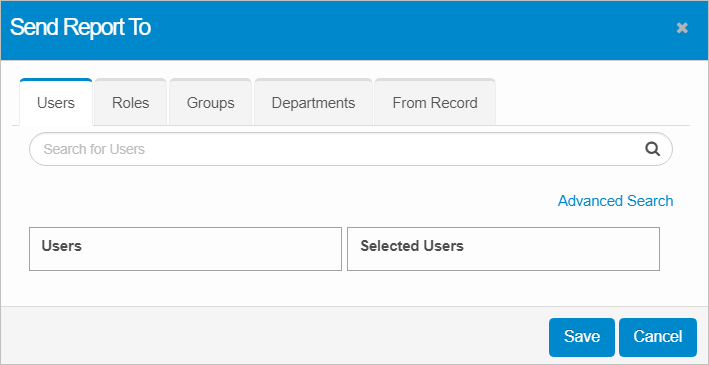
| 3. | To send a report on an escalation, in the To field, click Add, make the applicable selections in the Send Report To dialog box, and click Save. |
| 4. | When all the escalation selections are made, click Save. |