AD Import and Authentication
Use this function to create a new Active Directory configuration.
Active Directory (AD) is a directory service that Microsoft developed for Windows domain networks and is included in most Windows Server operating systems as a set of processes and services.
What is Active Directory
An AD domain controller authenticates and authorizes all users and computers in a Windows domain type network—assigning and enforcing security policies for all computers and installing or updating software. For example, when a user logs into a computer that is part of a Windows domain, Active Directory checks the submitted password and determines whether the user is a system administrator or normal user. Active Directory makes use of Lightweight Directory Access Protocol (LDAP) versions 2 and 3, Microsoft's version of Kerberos, and DNS.
In the main window, click Admin > Users > Ad Import/Authentication. The AD Configuration window displays.
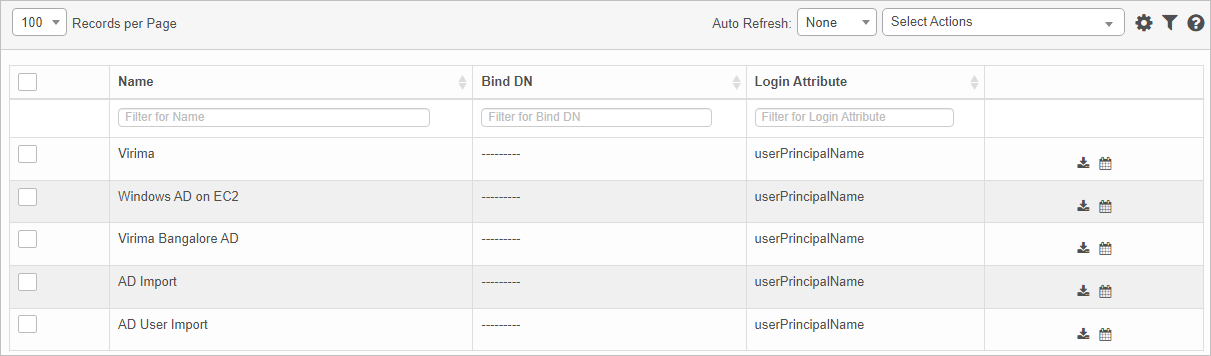

 New AD Configuration
|
1.
|
From the Select Actions drop-down list, choose AD New Configuration. |
|
2.
|
On the Configuration tab, fill in the values for the attributes. |
| |
By default, the Login Attribute is set to userPrincipalName.
When Is Public is selected, there is no Client field.
|
|
3.
|
Click Next. The Map Properties tab displays. |
|
4.
|
Select (check) the fields that need to be imported, and map their values to that of an applicable AD property. |
Testing AD Configuration
|
1.
|
Open the AD Configuration line item. |
|
2.
|
From the Select Actions drop-down list, choose Test AD Configuration. |
|
3.
|
Click Test AD Configuration. |
If you have set the values of the attributes correctly as per your organization's AD structure, then the connection will be a success. Otherwise, it will fail.
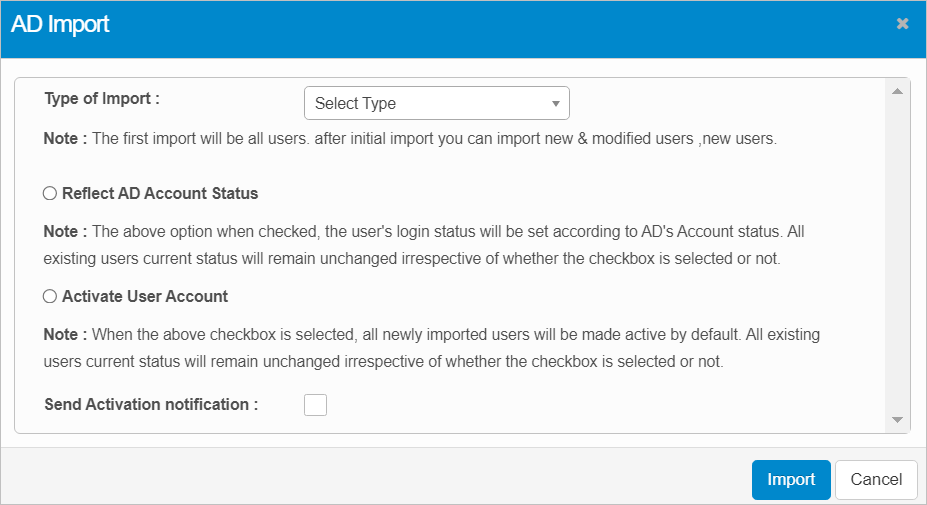
Import Users
While Importing users into Virima , Virima looks whether a particular Location, Role, Designation, Department and Group is present, if not Virima creates one.
For consecutive AD imports, the value of a user gets updated if the value has been modified in the AD.
After AD configuration, do the following:
|
1.
|
Click the Import icon to the right of the selected line item. |
The AD Import dialog box displays.
|
2.
|
For Type of Import, click the drop-down list and select the applicable option. |
|
3.
|
Select the other options, as necessary. |
|
4.
|
When all selections/entries are made, click Import. |
|
5.
|
A confirmation message displays. Click OK. |
Scheduled AD Import
After AD configuration, do the following:
|
1.
|
Click the Schedule Import icon to the right of the selected line item. |
The Schedule AD Import dialog box displays.
|
2.
|
Select Enable Schedule Import to turn on the import function. |
|
3.
|
Select Activate User Account to activate all users. |
|
4.
|
Select Send completion notification to the applicable users when the import is complete. |
|
5.
|
In the AD Import Frequency field, click the drop-down list and select the applicable import frequency, such as Every Day, Every 2 days, and so forth. |
|
6.
|
In the Type of Import field, click the drop-down list and select the type of import, such as All Users. |
|
7.
|
In the schedule area, select the appropriate timing. |
|
8.
|
When all selections/entries are made, click Add. (If you are editing the existing information, the Add button changes Update.) |
Edit AD Import Configuration
| |
Not all functions include an option to edit record line items shown in the main window. |
|
1.
|
Navigate to the window containing the record to edit. |
|
2.
|
Click the line containing the record. The applicable window or dialog box displays. |
|
3.
|
Make the necessary modifications. |
|
4.
|
Click Save or Add, as applicable. |
When editing an existing item, other options may be available, such as adding , , and and viewing .
| |
The options change based upon the function; therefore, not every option may be shown. |
Delete AD Import Configuration
| |
Deleting is a permanent action and cannot be undone. Deleting may affect other functionality and information in the application such as data in configured reports, fields in windows, selectable options, etc. Therefore, be sure to understand the potential effects before making a deletion. |
|
1.
|
Click the line that contains the item to delete. |
|
2.
|
From the Select Actions drop-down list, choose Delete. If a confirmation message is displayed, take the appropriate action (for example, click OK or Continue). |
Other Functions and Page Elements