New Users
Use this function to add new users to the application.
| 1. | In the main window, click the gear icon and select Users > Users. |
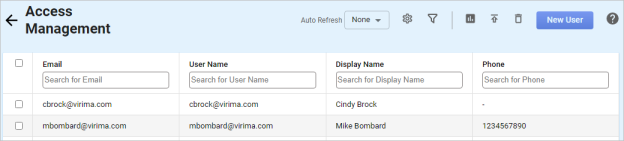
| 2. | Click New User. |
| 3. | To complete the fields, refer to the information shown in the table below. |
| 4. | When all selections/entries are made, click Add. |
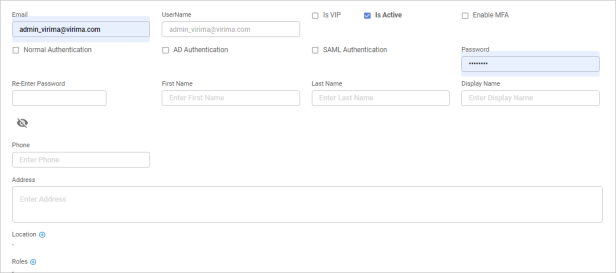
New User Details Fields
| Field | Description | ||
|---|---|---|---|
| User's email address. | |||
| Username | Username for logging into the system. | ||
|
Is VIP |
Identifies a user for whom their tickets are given a 1-Priority, by default.
|
||
|
Is Active |
When selected, the user is active in the application and can perform the assigned activities.
|
||
|
Enable MFA |
When selected, allows the user to set up MFA mail or an authenticator app that adds secondary login verification for Virima. | ||
|
Authentications |
Check based on your organization mode of authentication process. Choices are LDAP, AD, SAML, and Normal. |
||
|
Password |
The password associated with the username. The password must be validated by entering it a second time in the Re-Enter Password field. To display the password, click Show Password checkbox or click the Show icon. |
||
|
User Information Fields |
Specifies the user's First and Last names, name to display when using the application, phone number and address. |
||
| Location |
Specifies the location of the user. Click Add and in the Location dialog box, search for and select the applicable location. If a location is not shown, it has not been set up in the application. See also Advanced Search.
|
||
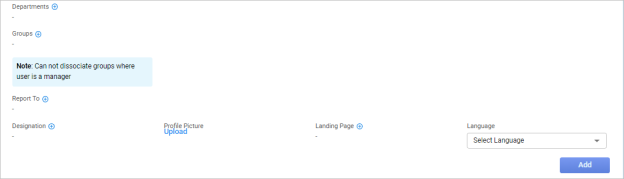
|
Assigns a role(s) to the user that allows the user to perform assigned responsibilities. |
|||
|
Associates the user with a department. |
|||
|
Associates the user with a group. |
|||
|
Report To |
Specifies to home the user reports. |
||
|
Assigns a designation to the user. |
|||
|
Profile Picture |
Displays a profile picture for the user. Click Upload. In the Attach File dialog box, Browse to the location of the photo, select the photo, then click OK. |
||
|
Landing Page |
Specifies the page that displays to the user on first accessing the application. |
||
|
Language |
Specifies the user's language. |