Scheduled Scans
Use this function to enable the execution of scan functionality according to a configured date and time.
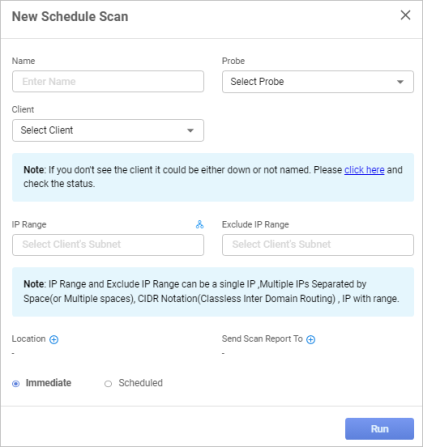
In the navigation pane, select Discovery Scan > Scheduled Scan. The Scheduled Scans window displays.


| 1. |
|
| 1. |
|

| 2. | Complete the fields, referring to the table below. |
| 3. | When all selections/entries are made, click Run. |
Scheduled Scan Fields
| Field | Description |
|---|---|
| Name | Name of the scan. |
| Probe |
The required probe. Refer to Probe Types. |
|
Client |
Name of the Client, which can be selected in the drop-down list. |
|
IP Range |
Specifies an IP Range to include in the scan. Click the icon to scan the entire subnet mask of the corresponding IP address. When adding an IP address, the IP range can be specified in various formats: 192.168.48.1 (Single IP)
192.168.48.1 192.168.49.2 (Multiple IPs of Different Subnets)
192.168.48.1,2,3,4 (Multiple IPs of Same Subnet)
192.168.48.1-50 (A wide Range of IPs in a Subnet)
192.168.48.0/24 (Single Subnet/CIDR Notation)
192.168.48.0/24 192.168.49.0/24 (Multiple Subnets/CIDR Notation)
|
|
Exclude IP Range |
Specifies an IP Range to exclude from the scan (optional). See IP Range, above, for a list of valid formats. |
|
Location |
|
|
Send Scan Report to |
|
|
Immediate |
Select if the scan should be run immediately instead of following a schedule. |
|
Scheduled |
Select if the scan should run at a set interval. Refer to Scan Frequency. |
| Not all functions include an option to edit record line items shown in the main window. |
| 1. | Navigate to the window containing the record to edit. |
| 2. | Click the line containing the record. The applicable window or dialog box displays. |
| 3. | Make the necessary modifications. |
| 4. | Click Save or Add, as applicable. |
When editing an existing item, other options may be available, such as adding Tasks, Comments, and Attachments and viewing History.
| The options change based upon the function; therefore, not every option may be shown. |
To view scans related to this scan, click the Related Scans tab.
| Deleting is a permanent action and cannot be undone. Deleting may affect other functionality and information in the application such as data in configured reports, fields in windows, selectable options, etc. Therefore, be sure to understand the potential effects before making a deletion. |
| 1. | Click the line that contains the item to delete. |
| 2. | From the Select Actions drop-down list, choose Delete. If a confirmation message is displayed, type Delete and click Deleteto confirm. |
Related Topics
Other Functions and Page Elements